How Stippling Differs From Drybrushing
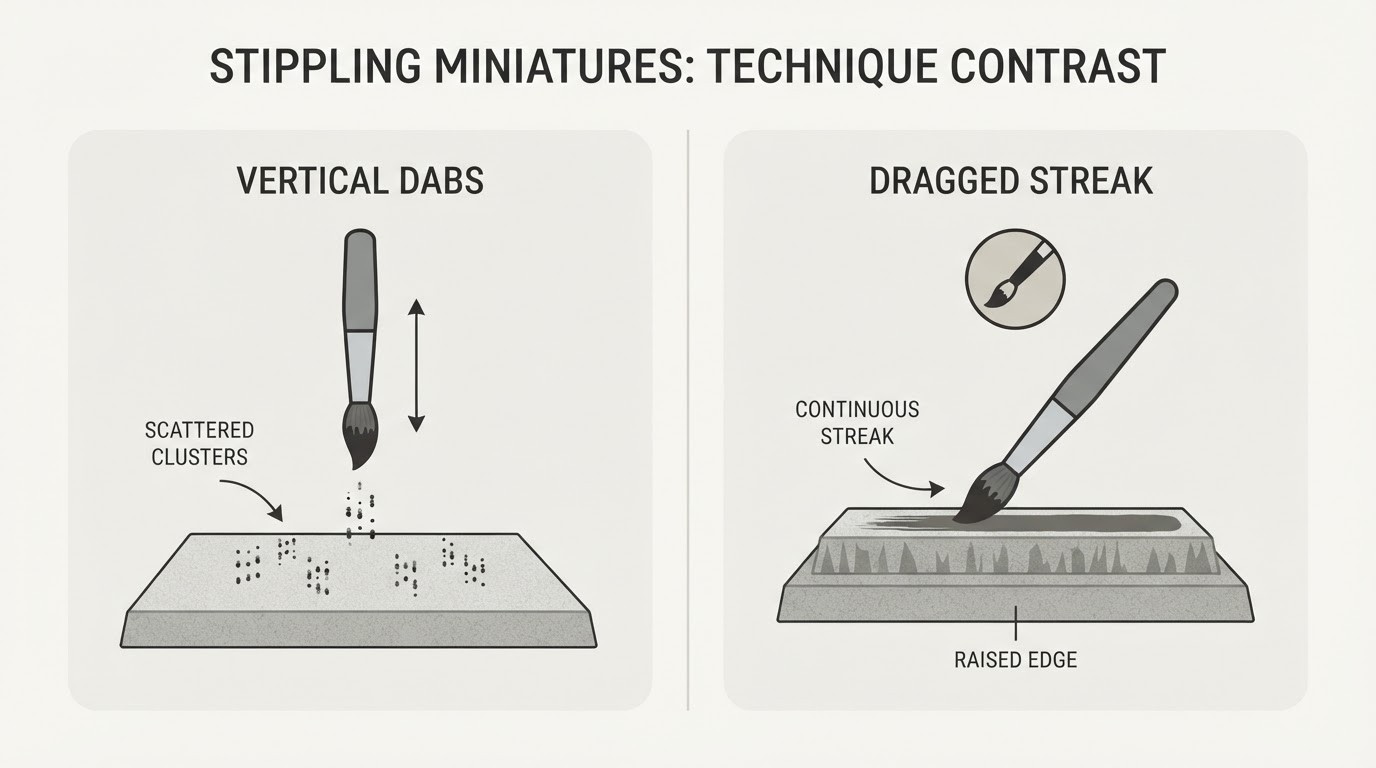
Stippling applies paint as dots pressed straight onto the surface; drybrushing drags a nearly dry brush across raised detail. A dragged drybrush leaves streaks that catch edges and highlights, while stippling leaves small patches that can suggest stone grain, chipped paint, mud, rust, or worn leather. Dave Garbe's stippling with sponges tutorial describes the technique as a way to apply a mix of color to a surface for texture, wear, scratching, peeling, and environmental effects. He prefers a sponge but notes that a rough brush with stiff bristles can also work.
Because dots are placed rather than dragged, stippling texturizes a large flat area without edge-highlighting every panel line. Decide the job first: if you want streaks on edges, drybrush; if you want mottled patches across a surface, stipple.
Load the Applicator, Then Take Paint Back Off
- Tear a small piece of sponge so fresh, irregular pores face the model, or pick a rough stiff brush you do not mind punishing.
- Dip lightly. You need paint on the applicator, not a reservoir.
- Blot. Press the loaded applicator a few times onto cloth or paper. Garbe compares this to unloading a drybrush, but with less paint removed.
- Test the first dabs on scrap before touching the miniature.
There is no universal thinning ratio. Thicker paint sits up as distinct dots; more dilute paint spreads into softer speckle, and too much water turns the dots into a wash that runs together. The useful consistency depends on the paint line, the applicator, and the finish you want, so settle it on the test piece.
Step by Step: Build Density Gradually
Start sparse on scrap
Dab a few widely spaced dots on a primed offcut or the underside of a base. Check how much paint each press deposits and how the dot edges look. Adjust the blotting first, not the paint.
Work in thin passes
Apply one sparse pass, let it dry, then add a second pass in a slightly lighter, darker, or contrasting tone depending on what the effect needs. Layering similar colors builds depth without turning the surface into a solid coat.
Control contact and rotate the applicator
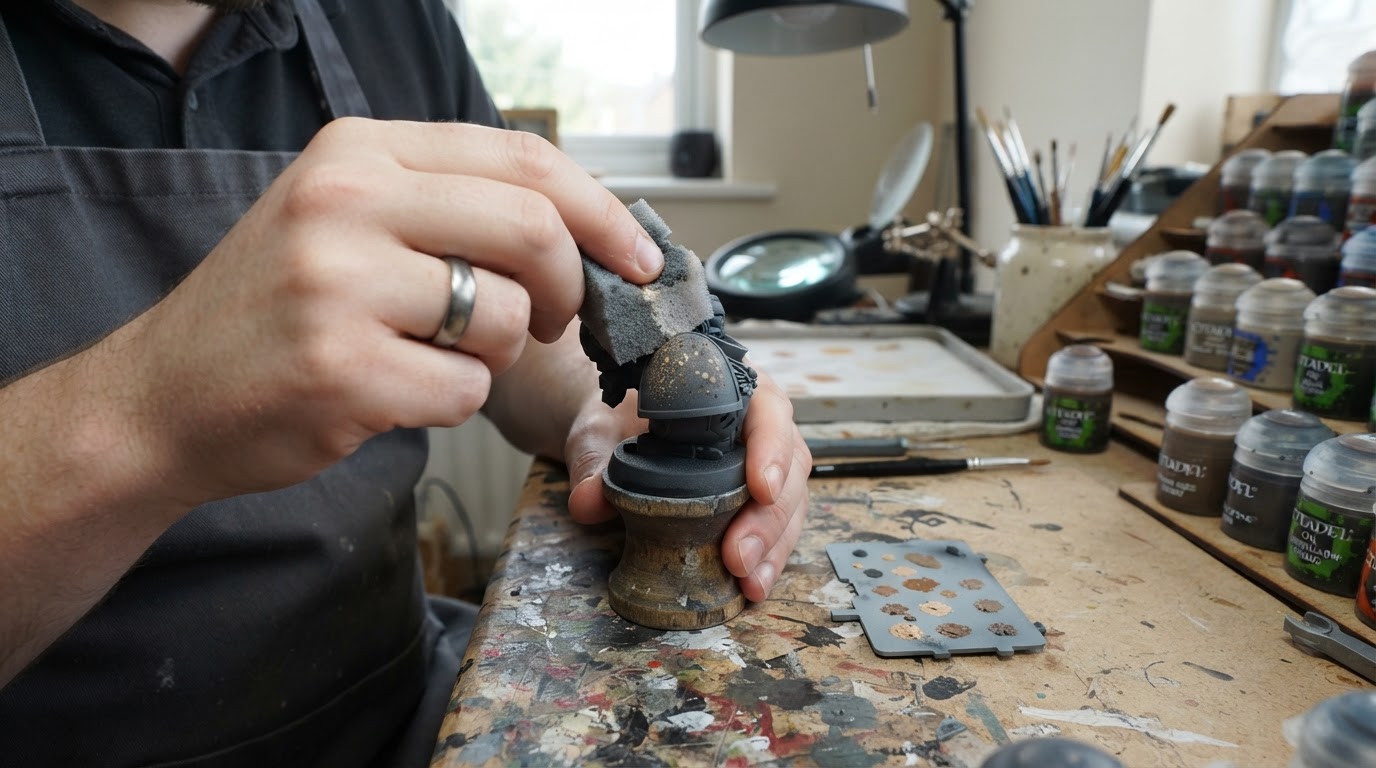
Bring the applicator down with light, controlled contact rather than forcing a whole flat face onto the model. On curved detail, a smaller contact patch, a lighter touch, or the edge of the applicator often gives more control than a single universal press. Turn or rotate the sponge between presses. Garbe points out that rotating avoids a uniform, repeated pattern, and that occasional larger spots are normal for a random effect.
Stop at the completion check
Step back to arm's length. The dots should read as texture, recesses should still be visible, and no patch should look wet or raised. If an area has gone solid, stop adding paint; Garbe notes that a light wash afterward is a good way to tone down and blend paint that stands out.
Sponge vs Stiff Brush
Both applicators stipple, but they do not always produce the same pattern. These are tendencies to check on scrap, not fixed rules. A torn sponge may release paint unevenly and leave clustered, irregular patches whose edges can read softer, which some painters like for stone, rust, and camouflage. A rough stiff brush tends toward tighter, more repeated dabs and puts more wear on the bristles, so keep a worn brush for it and see whether the pattern suits the surface. Pressure, paint consistency, and the age of the tool can all change the result.
Applicator | Typical result to assess on scrap | Often used for |
|---|---|---|
Torn sponge | Clustered, irregular patches; edges may read softer | Stone, rust, mud, camouflage |
Rough stiff brush | Tighter repeated dabs; more bristle wear | Small patches, controlled speckle |
Try both on an offcut with your own paint and pressures. If you switch applicators partway through a pass, the mixed pattern may or may not suit the effect, so judge that on the test piece before committing it to the miniature.
Where It Fits in the Paint Job
Stipple after the base coat is dry. Decide the tone of each pass from the effect you want rather than a fixed color order: later passes can go lighter, darker, or contrasting depending on whether the texture should lift or recede. Keep the first layer sparse and make the second denser only where the texture should concentrate, such as lower legs, shoulders, or the edges of armor plates. If you are still working through priming, base coats, and shading, this beginner acrylic painting walkthrough covers the order those steps belong in.
Stippling rewards restraint more than volume. Load light, blot the excess, use gentle contact, and test each change on scrap before it reaches the model.