Can matte varnish reduce metallic sheen?
It can, and the change is optical rather than chemical. Metallic acrylic paint is loaded with small reflective flakes; the surface reads as metal when those flakes bounce light back toward you as a narrow, bright highlight against a darker surround. A matte clear coat roughens the outermost surface enough that the same light leaves in many directions, so the highlight spreads into a general glow and the flake underneath loses its job.
The Army Painter's painting guide describes that mechanism in its matt varnish entry: the finish is non-reflective because it scatters light, it warns that this can leave a miniature looking a bit dull and tends to ruin the shine of metallic paints, and it recommends keeping matt for non-reflective surfaces such as cloth, dirt or wood (Varnishes 101). That is a general statement about the finish, made by a manufacturer that sells matte varnish, and it matches what the physics predicts.
How much shine you lose depends on the metal, the varnish and how thick the coat goes on. Neither source puts a figure on it, and the guide's warning is a general one rather than a measured comparison.
The product page that claims to keep the shine
There is a second Army Painter statement that points the other way. The CP3003S Anti-Shine Matt Varnish page says the spray was tailored to remove the shine of models dipped in Quickshade or painted with conventional paints, then adds that although the finish is really matt, the spray's original formula retains the metallic shine from Plate Mail (CP3003S product page).
Read at their own scope, the two statements can both hold. The guide explains what a matte finish normally does to metallic paint. The product page makes a claim about one specific formulation, naming Plate Mail — a paint from the same maker's range — as its example. It does not describe a test method, report a comparison against unvarnished metal or promise the same result with another brand's silver, gold or coloured metallic.
Match the finish to the surface
The same guide sorts the three finishes by what they do to light, and its descriptions map fairly directly onto the parts of a miniature that want each one.
Finish | What the guide says it does | Surfaces it names |
|---|---|---|
Matt | Flat and non-reflective because it scatters light; can dull metallics and reduce glare in photographs | Cloth, dirt, wood |
Satin | Sits between matt and gloss with a subtle sheen; the guide's author calls it his preferred finish for most models | Sci-fi armour, lacquered wood, skin |
Gloss | Even, highly reflective, shiny or wet-looking | Gems, glass, lenses, wounds, eyes |
Application changes the result as much as the finish does. Brush-on varnish is the precise option: the guide notes it lets you coat exactly where you want and control contrast between matt and gloss areas, and its author uses brush-on matt varnish to tone down specific shiny spots. An airbrush lets you thin the coat until matt reads less flat or gloss reads less reflective. Sprays are sold in matt, satin and gloss, and how much protection a given can adds is set by its own formulation, so read the label rather than assuming a format is tougher.
Test the exact paint and varnish first
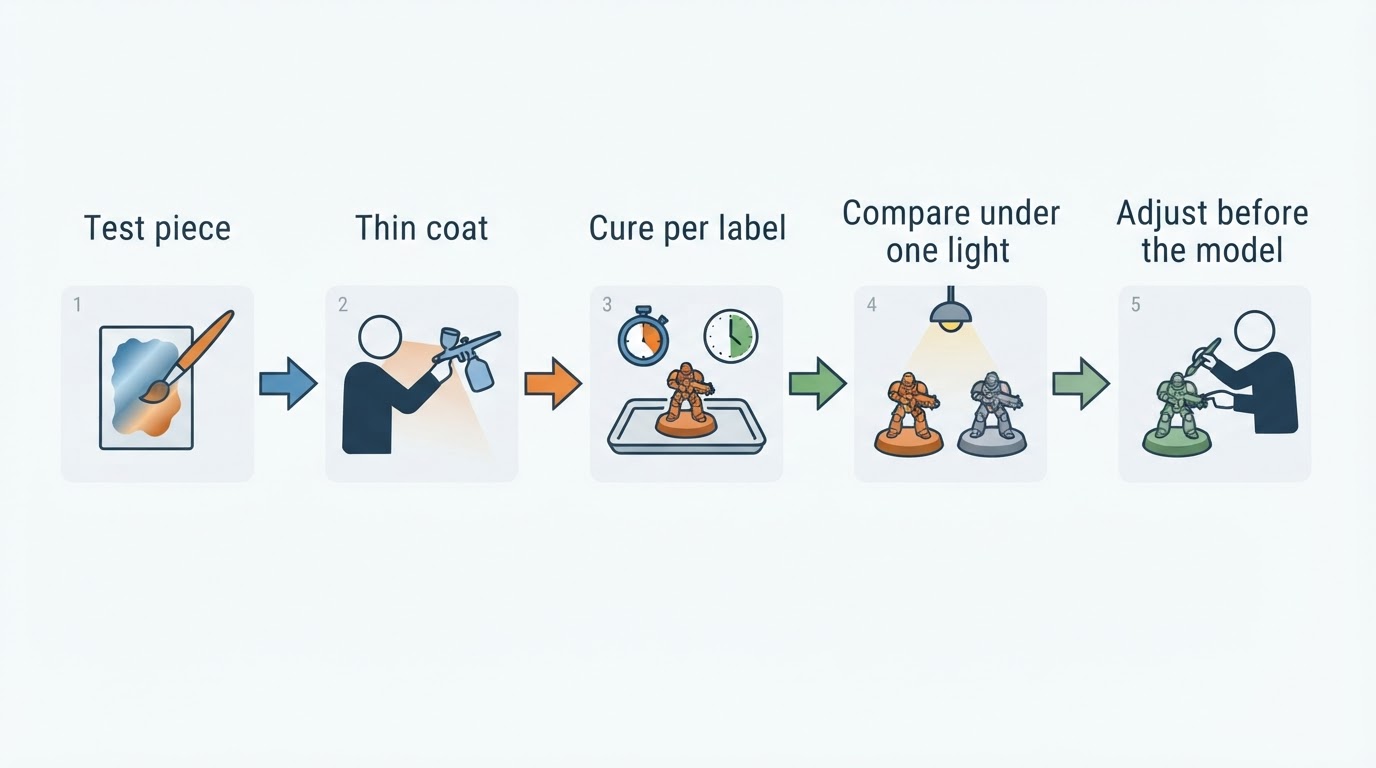
- Build a test surface that matches the real thing, and do it before the varnish goes anywhere near a finished model. A spare base, an off-cut of the same material or a hidden part of the model, such as the underside of the base or the inside of a cloak, all work. Use the same primer, the same metallic and the same number of layers, so the comparison reflects the paint you will actually varnish.
- Apply the varnish exactly as planned: same product, same thinning, same thin coat. The CP3003S page asks for a thin coat and says to test on a model before spraying a whole army, which is good practice for any clear coat.
- Let it dry for the interval on that product's label, then judge the cured finish. A wet coat and a cured coat do not look the same, so comparing a fresh test against an older model gives a misleading answer.
- Compare under one light source, at the angle you normally view or photograph the model, and tilt the piece slowly. Metal can look flat head-on and still hold a highlight at a lower angle.
Keep cloth matte and metal reflective
The workable sequence for a mixed model is two coats with two jobs. Protect the whole figure with a finish you can live with; the guide's author picks satin as his default for most models. Then bring reflection back only where it belongs, using a thin brush-on gloss or satin on trim, blades, jewellery and lenses.
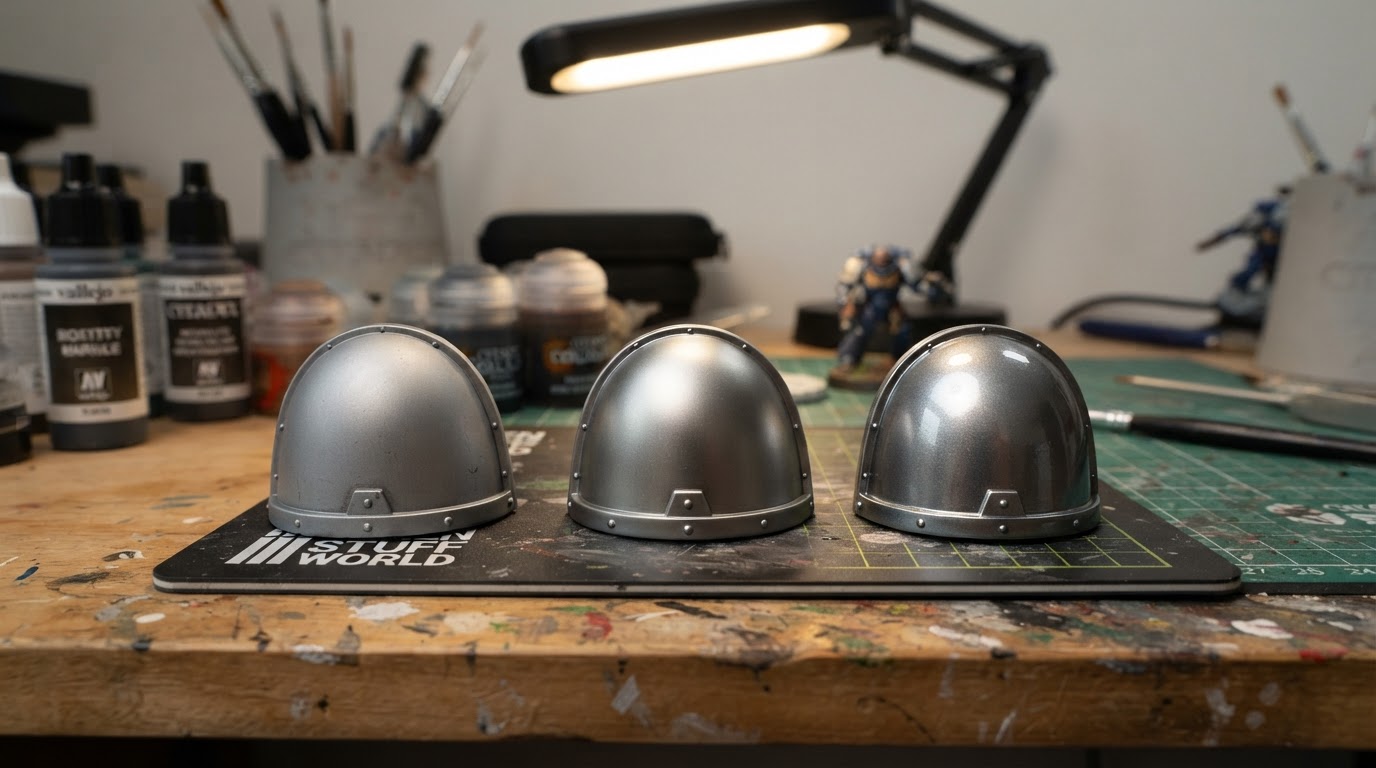
Order is a choice you make once, not a rule. If you plan to spray the whole figure matt, masking the metal areas first keeps them out of that coat, and picking the metal out afterwards with a brush is the alternative when masking is impractical. Either way, keep the additions thin. The label wording on the CP3003S spray is "apply it in a thin coat," and that instinct applies to brush-on work too: a thick clear layer fills detail and makes the finish look milky rather than controlled.
Gloss earns its place on gems, glass, lenses and wounds because those surfaces should reflect like hard, wet material. Spread across cloth and skin, the same coat tends to read as plastic, which is why the finish is usually chosen per surface rather than once for the whole figure. If the look you want is a uniformly wet, lacquered model, an all-over gloss is the deliberate version of that choice rather than a mistake.
Painted reflections are a different case
Non-metallic metal changes the answer. If the metal on the model is painted with opaque greys and blues as a picture of reflection, there is no reflective flake to scatter, and the painted highlight stays visible under a clear coat. A matte varnish still removes the surface sheen, which can make the painted effect look chalkier, but it is not destroying a metallic reflection that was never there.
True metallic paint works the other way round: the pigment provides the reflection, and the clear coat sits directly in the path of the light. That is why a finish that flattens painted cloth can also flatten a real metallic area, and why the two methods respond differently to the same varnish. If you are deciding between them, our comparison of non-metallic metal and metallic paint covers the painting side rather than the finishing side.
What a second coat can and cannot fix
A gloss or satin layer over cured matte adds a new, smoother surface above the flat one, and it may visibly alter the sheen on a metal area. It is the obvious repair attempt, and it is the one worth testing first; check the repaired test piece before repeating the process on the model.
One separate problem is worth keeping apart from dulling. If the dried coat looks cloudy, pale or rough rather than merely flat, that is frosting: a defect in the clear layer rather than a sheen decision. Our guide to varnish frosting on miniatures covers the checks and the order to work in.
Follow the label for curing and spraying
The CP3003S page gives three conditions alongside its shine claim: let Quickshade dry for at least 48 hours before applying the varnish, apply a thin coat, never spray in humid conditions or cold weather, and test on a model before spraying a whole army. Those instructions belong to that spray used over Quickshade. The 48-hour interval is not a general rule for every acrylic varnish or every base coat, so use the timing printed on the product you are actually holding, including the drying interval for the paint underneath.
Spray cans add their own constraints, and the label on the can is the authority for ventilation, distance, temperature and number of passes. Working outdoors or in a well-ventilated space, away from ignition sources, with the model on a stand rather than held in the hand, is the baseline for aerosol work regardless of brand.